Photobucket boasts room for up to 10,000 photos and hours of video all for free.
You can upload by email, IM or mobile phone.
Then you can use your uploaded images in slideshows and mashups with music, special effects, captions, and more.
Photobucket says that they are the "most popular site on the Internet for uploading, sharing, linking and finding photos, videos, and graphics. "
Photobucket's online store lets you print pictures, as well as add them to shirts, hoodies, mugs, calendars, stickers, wall posters and more.
FYI
- Photobucket was founded in 2003 and acquired by Fox Interactive Media, Inc., a division of News Corp. (NYSE: NWS) in July 2007.
- Photobucket has 20 Million unique site visitors/month in the US, and over 39 Million unique site visitors/month worldwide
and 18th Largest Ad supported site in the US.
Your Photobucket album has a unique email address associated with it. You can find that email address when you click on Account Options in the upper right corner of your album. It's a bit of a long email address, so make it a contact name in your phone book so you don't need to enter it every time. Whenever you take a pic, send it by MMS email to that address. The pic will show up instantly in the album. It's really easy!
Linking Basics from Photobucket
How to link files directly from Photobucket to your favorite forums, message boards, emails, instant messenger, and web layouts.
You must be a Photobucket account holder. You must also have content uploaded in your Photobucket account.
- Open the Photobucket site at http://www.photobucket.com
log in button to log into your Photobucket account.
- Select the albums & upload button from the menu at the top of your album.

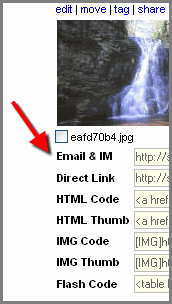
- Locate the thumbnail image for the file you want to direct link, and notice the separate linking codes below it.

OR
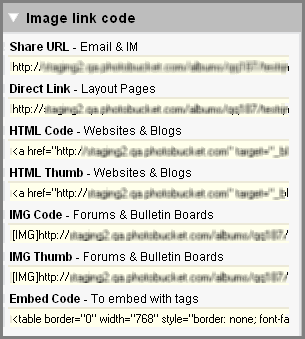
These same codes are available on the full-view page in the Image link code panel.

The functionality of images embedded with the HTML Code, HTML Thumb, and IMG Thumb is affected by whether you have Images Link Back To Album selected or deselected in your account options. See What is the 'Images Link Back To Album' option for details.
HTML Code – full size
Use this to embed your content (at its full size) on websites or blogs.HTML Thumb - clickable thumbnail
Use this to embed your content as a clickable thumbnail (160 x 120 pixels) on websites or blogs such as MySpace, Hi5, blogger, eBay and more! Your media will display on the site that it is linked to.IMG Code – full size
Use this to embed your content (at its full size) on bulletin boards and forums. You may have to modify the code to [img] on some forums. Your media will display on the site that it is linked to.IMG Thumb - clickable thumbnail
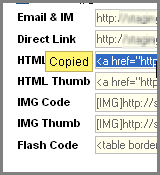
Use this to embed your content as a clickable thumbnail (160 x 120 pixels) on bulletin boards and forums. Your media will dsiplay on the site that it is linked to. - Click in the field that contains the code that you want to use. If the Photobucket one-click copy is active, the yellow 'Copied' box will appear when you click on a code.

- Navigate to the place where you want your image to display. This might be a forum, message board, email, instant message, etc. Paste the code into the appropriate field.


0 comments:
Post a Comment